Configuring Static Routes in Windows
In the realm of contemporary networking, routing is essential for directing data packets between different networks. While this task is often managed by specialized devices like routers, a Windows machine can also be configured to handle routing, which is especially beneficial in small offices, labs, or for network troubleshooting.
A key aspect of routing is the addition of static routes. Static routes are manually set paths that define how traffic should flow to specific destinations. Unlike dynamic routing, where routes are automatically learned and updated, static routes offer more control and predictability. They are particularly useful for connecting to remote subnets or ensuring traffic goes through a specific gateway.
To enable a Windows machine to function as a router, you need to activate the Routing and Remote Access Service (RRAS) or use Internet Connection Sharing (ICS). Once configured, the system can route traffic between multiple network interfaces, with static routes playing a crucial role in defining this behavior.
Windows provides several tools for managing static routes, including the command line ( route command) and graphical interfaces. However, PowerShell, with its robust scripting capabilities and dedicated networking cmdlets, has become the preferred choice for many administrators. Using PowerShell, you can not only add static routes but also automate and script these configurations for large-scale deployments or repetitive tasks.
The New-NetRoute PowerShell cmdlet, available through the NetTCPIP module, simplifies the process of adding static routes. This cmdlet allows you to specify important details such as the destination network, subnet mask, gateway, and interface. Additionally, PowerShell offers comprehensive error handling and logging, making it easier to troubleshoot and ensure the successful configuration of routes.
Here’s a guide on how to use PowerShell to add static routes effectively. Whether you are configuring a Windows machine to act as a router or managing routes for specific networking tasks, PowerShell provides a straightforward and efficient approach.
Static routes are necessary in various scenarios:
- When security considerations prevent specific routes from being added to the default gateway, and an additional routing device is needed.
- When setting up multiple subnets or VLANs and needing to direct traffic to a particular subnet, static routes can be very useful, especially in testing environments.
- When using two internet routers (primary and secondary) and wanting to route social media and streaming traffic through the secondary router while keeping other traffic on the primary router.
- When using a Windows PC as a router and needing better control over the routing table and traffic flow.
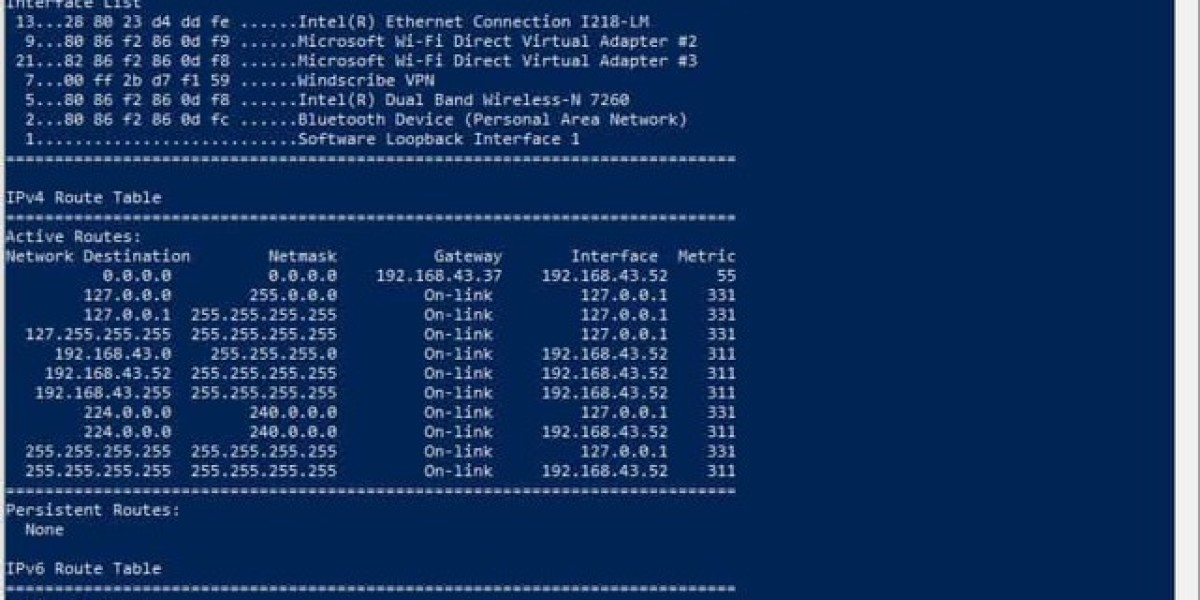
Before making any changes to the routing table, it is important to understand the existing routes. To view the routing table on a Windows machine, follow these steps:
- Type “cmd” or “powershell” in the Windows search bar to locate the application.
- Right-click on the application and select “Run as administrator.”
- In the opened PowerShell or Command Prompt, type the following command to display the routing table:
```
route print
```
Routing table entries in Windows contain key components that define path selection logic:
Network Destination specifies the target subnet or host address range for packet forwarding.
Subnet Mask determines the network class by isolating the destination's network portion from host identifiers.
Next-Hop Gateway indicates the adjacent device IP responsible for relaying traffic to the destination network.
Associated Interface identifies the physical/virtual network adapter used for transmitting packets.
Route Priority uses Metric values to select optimal paths – lower numerical metrics indicate preferred routes when duplicates exist.
Configuration Persistence distinguishes between temporary routes (deleted at system restart) and permanent entries stored in the registry via the -Persist flag in route commands.
This structure enables dynamic routing decisions while allowing administrators to enforce specific traffic paths across reboots.
Static Route Configuration in Windows
Configuring Static Routes in Windows with PowerShell
Windows administrators often need to manually configure network routing for specific scenarios. PowerShell provides a powerful cmdlet called New-NetRoute that simplifies this process. This guide explains how to implement static routes using PowerShell commands.
Understanding the New-NetRoute Cmdlet
The New-NetRoute cmdlet allows you to create custom routing table entries in Windows. The basic command structure is:
```powershell
New-NetRoute -DestinationPrefix
```
Finding Your Network Interface
Before adding routes, you need to identify the correct network interface. Use this command:
```powershell
Get-NetAdapter | Format-Table Name, InterfaceIndex, Status
```
This displays all available network interfaces with their corresponding index numbers.
Basic Static Route Configuration
To create a basic static route, use this syntax:
```powershell
New-NetRoute -DestinationPrefix 192.168.50.0/24 -InterfaceIndex 5 -NextHop 192.168.1.1
```
This example routes traffic destined for the 192.168.50.0/24 network through gateway 192.168.1.1 using interface index 5.
Creating Persistent Routes
By default, static routes are lost after system restart. To make routes survive reboots:
```powershell
New-NetRoute -DestinationPrefix 192.168.50.0/24 -InterfaceIndex 5 -NextHop 192.168.1.1 -PolicyStore PersistentStore
```
Setting Route Priority with Metrics
When multiple routes exist to the same destination, Windows uses metrics to determine priority:
```powershell
New-NetRoute -DestinationPrefix 192.168.50.0/24 -InterfaceIndex 5 -NextHop 192.168.1.1 -RouteMetric 5
```
Lower metric values indicate higher priority routes.
Using Interface Names Instead of Indexes
For better readability, you can reference interfaces by name:
```powershell
New-NetRoute -DestinationPrefix 192.168.50.0/24 -InterfaceAlias "Ethernet" -NextHop 192.168.1.1
```
Advanced Configuration Options
The New-NetRoute cmdlet supports additional parameters:
- Use
-Publish:$falseto create hidden routes
- Specify
-PolicyStore BootStorefor routes applied during system startup
- Configure routes for specific network profiles with appropriate PolicyStore values
Verifying Your Routes
After adding routes, verify them with:
```powershell
Get-NetRoute | Where-Object DestinationPrefix -eq "192.168.50.0/24"
```
This confirms your route configuration was successful.
To manage and add static routes in a Windows environment, PowerShell provides a straightforward method. Ensure you have the necessary permissions by running PowerShell as an administrator before starting.
First, to view the current routing table and all existing static route entries, enter the Get-NetRoute command. This will display all the routes that are currently configured on your system.
Understanding how to add a static route is crucial for network administration. By using the appropriate PowerShell cmdlets, you can easily configure these routes. For detailed instructions and additional parameters, refer to the PowerShell documentation or use the Get-Help New-NetRoute -Detailed command within PowerShell. This will provide you with comprehensive information based on your specific PowerShell version.
This guide aims to simplify the process of adding and managing static routes, making it easier for administrators to handle network configurations effectively.
What is a Netflix VPN and How to Get One
A Netflix VPN is a service designed to help users overcome geographic content restrictions by masking their real location and routing their internet connection through servers in other regions. This tool enables access to a wider variety of shows, movies, and exclusive titles available only in specific countries’ Netflix libraries. By using a Netflix VPN, viewers can unlock global content and enjoy a more diverse streaming experience tailored to their preferences.
Why Choose SafeShell as Your Netflix VPN?
If you're looking to access region-restricted content through a Netflix VPN, SafeShell VPN is an exceptional option worth considering. This powerful service offers several advantages that solve the common " Netflix vpn not working " issues many users face:
- High-speed dedicated servers specifically optimized for Netflix streaming, ensuring buffer-free playback and high-definition viewing experiences without interruptions
- Multi-device capability allowing connection on up to five devices simultaneously across various platforms including Windows, macOS, iOS, Android, and smart TVs
- Innovative App Mode feature that uniquely enables access to content from multiple regional libraries at the same time
- Lightning-fast connection speeds with zero bandwidth limitations, eliminating the frustrating buffering and throttling issues common with other VPNs
- Advanced security through the proprietary "ShellGuard" VPN protocol that protects your browsing sessions with top-level encryption
- Risk-free exploration through a flexible free trial plan that lets you test SafeShell VPN's capabilities before committing to a subscription
A Step-by-Step Guide to Watch Netflix with SafeShell VPN
- Start by securing your SafeShell Netflix VPN subscription through their official website, picking a plan tailored for uninterrupted streaming access
- Install the SafeShell application on your device (Windows, macOS, iOS, Android, etc.) after downloading the version specific to your operating system
- Log into the VPN app using your credentials and switch to "APP Mode" from the interface—this mode prioritizes speed and compatibility for streaming platforms
- Navigate to the server list, then select a location aligned with your target Netflix region (e.g., Australia, France, or Brazil) before clicking "Connect" to activate the VPN tunnel
- Once connected, open Netflix via your browser or app, sign in, and explore the expanded library of shows and movies available in your chosen region with SafeShell Netflix VPN